1. Service Communication and Data Consistency
If a microservice in the middle of a synchronous REST request chain fails, failure recovery can be handled using resilience patterns to prevent cascading failures and improve system stability. Here’s how:
1. Implement Circuit Breaker Pattern (Prevent System Overload)
The circuit breaker prevents the system from repeatedly calling a failing service, which could lead to further slowdowns.
Solution: Use Resilience4j Circuit Breaker to monitor failures and temporarily stop calls to the failing service.
@CircuitBreaker(name = "orderService", fallbackMethod = "fallbackResponse")
public String callOrderService() {
return restTemplate.getForObject("http://order-service/api/orders", String.class);
}
public String fallbackResponse(Exception ex) {
return "Fallback: Order Service is unavailable, please try again later.";
}
📌 How it works:
Real time example - In simple terms, a circuit breaker is like a safety switch in a system that prevents it from repeatedly trying to do something that’s failing, which could make the situation worse.
Imagine you're trying to plug an appliance into a socket, but the socket keeps sparking (failing). If you keep plugging it in, it could cause damage. So, you use a circuit breaker to cut off power to that socket temporarily. This gives the system time to recover before you try again.
In the same way, in a microservices architecture, a circuit breaker monitors calls between services. If one service is failing (for example, it’s too slow or unavailable), the circuit breaker “opens” and stops the system from trying to call that service repeatedly. This helps avoid overloading the failing service and gives it time to recover.
Once the service seems to be working again (after a timeout or a check), the circuit breaker "closes" and the system can try calling the service again.
order-service fails multiple times, the circuit breaker opens and stops further calls.2. Use Retry Mechanism for Temporary Failures
If the failure is intermittent, retrying after a short delay can resolve the issue.
Solution: Use Spring Retry to automatically retry failed requests.
@Retryable(value = {HttpServerErrorException.class}, maxAttempts = 3, backoff = @Backoff(delay = 2000))
public ResponseEntity<String> callPaymentService() {
return restTemplate.getForEntity("http://payment-service/api/payments", String.class);
}
📌 How it works:
Real time example: In simple terms, imagine you're trying to make a phone call, but the line is temporarily bad and the call fails. Instead of hanging up immediately, you try calling again after a short pause, and eventually, the connection works.
In a system, sometimes a failure is just temporary, like a service being momentarily slow or unavailable. Rather than giving up on the first failure, Spring Retry automatically tries to make the request again after a brief delay. It keeps retrying a few times before it gives up, hoping that the problem will resolve itself in the meantime.
This approach works well for intermittent issues, where a retry could succeed after a short delay.
- If the `payment-service` fails, the request will retry up to **3 times** with a **2-second delay**.
3. Set Timeouts to Avoid Blocking Requests
If a service is unresponsive, requests may hang indefinitely. Timeouts ensure that failing services do not slow down the entire system.
Solution: Configure timeouts for outgoing HTTP calls.
@Bean
public HttpComponentsClientHttpRequestFactory clientHttpRequestFactory() {
HttpComponentsClientHttpRequestFactory factory = new HttpComponentsClientHttpRequestFactory();
factory.setConnectT`imeout(3000); // 3 seconds
factory.setReadTimeout(5000); // 5 seconds
return factory;
}
How it works:
Real time example : In simple terms, imagine you're waiting in line at a coffee shop, and the barista is taking too long to make your coffee. Instead of waiting forever, you set a limit on how long you're willing to wait. If the coffee isn't ready in that time, you walk away.
In a system, when one service takes too long to respond, it can slow down everything else. Timeouts are like setting a waiting limit for requests. If a service doesn’t respond within the set time, the system stops waiting and moves on, preventing other parts of the system from getting stuck. This keeps the system running smoothly instead of letting one slow service bring everything to a halt.
- If the service does not respond within 5 seconds, the request is aborted.
4. Implement Fallback Mechanisms
When a service fails, return a default response or use a cached response instead.
Solution: Store recent successful responses in a cache (e.g., Redis) and serve them when the service is down.
public String fallbackOrderDetails(String orderId, Throwable ex) {
return redisCache.get("order_" + orderId, String.class); // Return cached order details
}
How it works:
Real time example: Absolutely! Here's the same example using Celsius instead of Fahrenheit:
Example: Weather App with Celsius
Imagine you're using a weather app that fetches the current temperature from an external service. If the weather service goes down, instead of showing an error, the app can show the last known weather report (stored in cache) while the service is unavailable.
For example:
- Last known report: "Sunny, 24°C"
- If the service fails, the app will show "Sunny, 24°C" from the cache, instead of displaying an error message or a blank screen.
This way, the user still gets a helpful, up-to-date temperature reading based on the last successful data retrieval, even if the weather service is temporarily down. It ensures the app remains useful while the service is unavailable.
If the order service is down, return the last successful response from Redis.
5. Use Asynchronous Processing for Non-Critical Requests
Instead of synchronous REST calls, consider event-driven communication (Kafka, RabbitMQ) for better resilience.
Solution: Instead of waiting for a response, publish an event to a message queue.
rabbitTemplate.convertAndSend("order_exchange", "order.created", order);
How it works:
Real time example:
Imagine you're signing up for a new account on a website. Normally, after you fill in your details, the website might wait for each step to complete, such as:
- Create User in the database
- Send Email for confirmation
In a synchronous system, the website waits for the email service to send the confirmation email before showing you a success message. If the email service is slow or down, the whole user registration might fail, and you’ll have a bad experience.
With event-driven communication, the process works like this:
- User Registration Service receives your details and immediately publishes an event like "UserRegistered" to a message queue (Kafka or RabbitMQ).
- The Email Service listens for "UserRegistered" events, and when it gets one, it sends a confirmation email.
- The order request is queued instead of blocking the request.
- Other microservices (e.g., payment, inventory) consume the event asynchronously.
Summary: Key Recovery StrategiesConclusion
To handle failure recovery in a synchronous REST-based microservices architecture:
- Use Circuit Breaker to prevent repeated calls to a failing service.
- Implement Retry for temporary failures with exponential backoff.
- Set Timeouts to avoid blocking the request chain.
- Use Fallback Responses or Cache for missing data.
- Move to Asynchronous Communication for non-critical requests. Q2: In an e-commerce application, an order service calls payment and inventory services. How do you ensure that the order is placed only if both payment and inventory updates are successful? Ensuring that an order is placed only if both payment and inventory updates are successful in a microservices architecture requires a strategy for distributed transactions and data consistency. Since microservices do not share a single database, traditional ACID transactions are not feasible. Below are effective solutions:
. Use the Saga Pattern (Recommended)
The Saga Pattern ensures data consistency across multiple services through a sequence of compensating transactions.
Two Saga Approaches:
- Choreography (Event-Driven)
- Orchestration (Centralized Controller)
1. Orchestration
Orchestration is like a central conductor in a symphony. A central service or orchestrator controls the entire workflow and tells each service what to do in a specific order.
Steps in Orchestration:
- Central Controller (Orchestrator): A central service or component controls the flow of events or tasks and makes decisions.
- For example, this could be a Workflow Engine that guides the entire process.
- Service Invocation: The orchestrator tells each service what to do and in what order.
- For example, after the user registers, the orchestrator first calls the Inventory Service, then the Payment Service, and finally the Shipping Service.
- Coordination: The orchestrator waits for each service to finish its task before moving to the next.
- It ensures that if any service fails, the process can be stopped or retried.
- Centralized Control: The orchestrator has the full control and logic of the workflow. All communication goes through it.
- Any errors or retries are handled by the orchestrator.
Example:
In a food delivery app, when an order is placed:
- The orchestrator (like a central Order Service) first calls the Payment Service, waits for a response, then calls Inventory, and finally, calls Shipping.
- If any service fails, the orchestrator handles retries or failure responses.
2. Choreography
Choreography is a decentralized approach where each service knows what to do and reacts to events or changes on its own. No central controller guides the services. Services work independently but still cooperate by responding to each other's events.
Steps in Choreography:
- Event-Driven: Each service listens for events from other services to trigger their own actions.
- For example, after the Payment Service completes, it publishes an event "PaymentCompleted" that other services (like Shipping or Inventory) listen to and react to.
- No Central Controller: There is no central orchestrator. Each service knows its role and reacts to the events or messages.
- Services are aware of their actions and dependencies through the event bus (e.g., Kafka or RabbitMQ), and they don't need a central authority to guide them.
- Loose Coupling: Services are loosely coupled. They don’t need to know about each other’s internal workings, just the events they care about.
- For example, the Shipping Service only needs to know that a "PaymentCompleted" event occurred. It doesn't need to know the internal details of the Payment Service.
- Independent Execution: Each service is responsible for its own tasks, and they operate independently.
- The services just react to events and don’t wait for a central authority to tell them what to do.
Example:
In a food delivery app:
- Payment Service publishes an event "PaymentCompleted".
- Shipping Service listens for the "PaymentCompleted" event and starts the delivery process.
- Inventory Service listens for the "OrderPlaced" event and updates the stock.
- Key Differences:
Summary:
- Orchestration: One central service controls the workflow, telling each service what to do.
- Choreography: Services communicate with each other through events, reacting and acting independently without a central controller. 2. Use the Outbox Pattern (Avoid Inconsistencies)
The Outbox Pattern is like a "safety net" for making sure that events are only sent out after a task is successfully completed. It helps avoid situations where something gets lost or doesn’t match up (called "inconsistencies").
Real-World Example:
Imagine you're at a restaurant and you place an order. The waiter writes down your order in a notebook (this is the database), but before your order is sent to the kitchen, the waiter has a "secret folder" (this is the Outbox table) where they also record the order (within the same transaction.) just in case something goes wrong.
- Step 1: When you place the order, the waiter writes it down in their notebook and immediately writes it in the secret folder (the Outbox table) with a note saying, "Order placed – needs to be sent to the kitchen."
- Step 2: A second person (like a kitchen runner) looks at the secret folder (Outbox table), sees that your order is listed, and then delivers the order to the kitchen.
- Step 3: If anything goes wrong (e.g., the waiter or kitchen runner forgets), the secret folder is still there as a backup. They can retry sending your order to the kitchen without worrying that the order was lost.
In the system:
- Outbox Table: A special table that stores events (like "Order Created") that need to be sent to another service (like a payment system or inventory system).
- The event relay (like a background worker or Debezium) checks this table regularly and sends the event to the right service (like Kafka).
- If the system crashes, the event is safe because it’s still in the database (the outbox). So, the system can try again later to send the event.
Why It’s Useful:
- Avoids Inconsistencies: It makes sure that if something goes wrong, the system can retry and won’t lose data (like an order or important event).
- Exactly Once Delivery: It ensures that the event (like a new order) is only sent once and isn’t duplicated.
Example in Code:
Let’s say you create an order in your Order Service. The event to notify other services is stored in the Outbox table:
INSERT INTO outbox (event_type, event_data, status) VALUES ('ORDER_CREATED', '{order details}', 'PENDING');
Pros and Cons:
- Pros:
- Ensures that no events are lost, even if there’s a system failure.
- Prevents inconsistency because the event is only sent after the database update.
- Cons:
You need a separate process (like the event relay) to pick up and send the events, which can add complexity.In Summary:
The Outbox Pattern is a way of safely storing events in a special table to ensure that they are only sent after the database action (like creating an order) is completed successfully. It helps ensure that nothing is lost, and even if something goes wrong, it can be retried later.
3. Use Distributed Transactions with 2PC (Not Recommended)Two-Phase Commit (2PC) locks resources until all services commit.
- Prepare Phase: Order Service requests transaction commit from Payment & Inventory.
- Commit Phase: If all services agree, the order is committed.
Problems:
- Not scalable (locks resources).
- Slow performance due to global coordination.
Avoid 2PC in microservices. Use Sagas instead.
- 4. Use Idempotency to Prevent Duplicate Orders
If retry mechanisms exist, they may cause duplicate orders.
Solution: Add an idempotency key (unique request ID)
if (orderRepository.existsByTransactionId(request.getTransactionId())) {return ResponseEntity.status(HttpStatus.CONFLICT).body("Duplicate request");}


5. Use Dead Letter Queues (DLQs) to Handle Failures
If a message (e.g., Payment event) fails multiple times, move it to a Dead Letter Queue for later processing.
A Dead Letter Queue (DLQ) is a specialized queue where messages that fail multiple processing attempts are sent. This helps prevent message loss and allows for troubleshooting, debugging, and retrying messages later.
How a DLQ Works
- Message Processing Attempt
- A message (e.g., a Payment Event) is picked up from the main queue and processed.
- Failure Handling & Retry
- If the processing fails (e.g., due to a database issue, API failure, or a bug), the message is retried a predefined number of times.
- This is typically configured as Max Retry Attempts (e.g., 3 attempts).
- Message Moves to DLQ
- If the message still fails after reaching the retry limit, it is moved to the DLQ instead of being discarded.
- The DLQ is separate from the main queue and holds these "failed" messages for further action.
- Monitoring & Processing DLQ Messages
- Messages in the DLQ can be inspected, fixed, or manually retried later.
- Some systems have automated retries with exponential backoff
RabbitMQ DLQ Configuration: x-dead-letter-exchange: "dlx.orders" x-dead-letter-routing-key: "orders.failed" - A user sends API requests.
- Redis keeps track of how many requests they have made.
- If they exceed 10 per second, new requests are throttled (delayed) or blocked.
- This ensures the system is not overloaded.
- JWT Authentication ensures that only valid users can access your microservices.
- Rate Limiting prevents abuse by limiting the number of requests a user or service can make within a given time.
- Request Validation ensures that incoming requests are correctly formatted and meet the required constraints before being processed by backend services.
- Generate and distribute certificates to all services in your microservices ecosystem.
- Configure each microservice to present its certificate when making requests and verify the certificate of the receiving service.
- Use a service mesh like Istio or Linkerd, which automatically handles mTLS for service-to-service communication.
- Each service is registered with an Identity Provider (IdP) such as Auth0, Okta, or Keycloak.
- When one service wants to communicate with another, it first obtains a JWT token from the IdP (using OAuth 2.0) and includes that token in the request header.
- The receiving service validates the JWT token to ensure the request is coming from an authorized service.
- You have restaurants (services) preparing food.
- You have delivery agents (service mesh) handling communication (picking up and delivering orders).
- The customers (users) don’t talk directly to the restaurants; they rely on the delivery agents to route their order correctly.
- Services don’t talk to each other directly.
- Instead, a Service Mesh (like Istio or Linkerd) acts as the “delivery network”, managing how services communicate securely, efficiently, and reliably.
- Automatic Mutual TLS: Istio can automatically configure mTLS between services, ensuring encrypted and authenticated communication.
- Policy Enforcement: Istio allows you to define security policies, such as requiring mTLS or restricting access based on identity.
- Rate Limiting: You can configure Istio to apply rate limits to inter-service calls.
- The API Gateway can authenticate inter-service calls using JWT or OAuth 2.0, just as it does for external traffic.
- You can configure the gateway to validate tokens and enforce security policies for internal requests.
- Service A sends a request to Service B via the Gateway:
- API Key: Each service has a unique API key used when making requests to other services.
- Shared Secrets: A secret string (or token) is shared between services and included in the headers of the request.
- Service A sends a request with the API key:
- Mutual TLS (mTLS) for encrypted and authenticated communication.
- OAuth 2.0 / JWT for token-based authentication between services.
- Service Mesh (e.g., Istio) for advanced security, traffic management, and observability.
- API Gateway for managing and validating internal service-to-service communication.
- API Keys or Shared Secrets for simpler use cases.
- You want to see restaurant details, menu, and delivery time on one screen.
- But this data comes from different services:
- 📍 Restaurant Service → Gives restaurant name & location.
- 🍕 Menu Service → Provides the list of dishes.
- 🚴 Delivery Service → Calculates delivery time.
- Call the User Service to fetch user details.
- Call the Order Service to fetch the user’s orders.
- Aggregate both responses and return the combined result. API Gateway for managing and validating internal service-to-service communication. API Keys or Shared Secrets for simpler use cases.
The appropriate method depends on your application's scale, complexity, and security requirements.
- You want to see restaurant details, menu, and delivery time on one screen.
- But this data comes from different services:
- 📍 Restaurant Service → Gives restaurant name & location.
- 🍕 Menu Service → Provides the list of dishes.
- 🚴 Delivery Service → Calculates delivery time.
- Call the User Service to fetch user details.
- Call the Order Service to fetch the user’s orders.
- Aggregate both responses and return the combined result.
- Network Latency: This approach may incur some performance overhead as multiple calls to different services need to be made.
- Error Handling: You need to handle errors properly in case one of the services is unavailable.
- User Service can push user data updates to the Order Service (via an event, for example).
- The Order Service will have some form of data duplication to make queries faster and avoid joining across databases.
- When a new Order is placed, the Order Service receives the order and stores it, including a reference (e.g.,
userId) to the User data. - The User Service will send an event (e.g.,
UserUpdatedEvent) to notify the Order Service of any updates to user data (using event-driven mechanisms like Kafka, RabbitMQ, etc.). - The Order Service stores relevant user data or the user ID within its own database to avoid cross-service querying.
- Data Consistency: This introduces the challenge of keeping data in sync between services. You’ll need mechanisms for eventual consistency.
- Eventual Consistency: Use event-driven mechanisms (e.g., event sourcing, CQRS) to ensure data synchronization between services.
- In CQRS, you have separate models for reads and writes. The write model (command model) updates data in the respective databases (e.g.,
User ServiceandOrder Service). - The read model (query model) is designed for fast retrieval of aggregated data from multiple services, often using a separate read-optimized database or cache.
- When a new order is created, the Order Service updates its database.
- The Event Store (e.g., Kafka, RabbitMQ) receives events for the newly created order and user information.
- A Read Model service listens to these events and creates a denormalized view that includes user and order information for efficient querying.
- Complexity: This approach adds complexity due to managing separate models for reading and writing.
- Data Consistency: This pattern works well for eventual consistency where real-time consistency isn't a strict requirement.
- A query layer (possibly an API Gateway or dedicated service) communicates with both the User Service and Order Service.
- The service then federates the results, combining data from multiple services and returning it in a unified response.
- You can extend a GraphQL query schema to fetch User and Order data in a single request.
- A GraphQL Gateway can fetch data from multiple services, combine them, and return the results in a single response.
- Complexity: Federated systems like GraphQL require a well-defined schema and a sophisticated query resolver.
- Overhead: Federation layers might introduce overhead, as queries need to be routed across multiple services.
- Periodically (or in real-time), data from the User Service and Order Service is replicated or copied into a separate reporting or read-only database.
- You can use ETL (Extract, Transform, Load) processes to synchronize data into this centralized read database.
- Queries are then run against the materialized view in the read database, avoiding joins across multiple microservices' databases.
- Synchronization: The challenge is keeping the materialized view updated, especially if data changes frequently.
- Cost and Complexity: Maintaining a separate data warehouse or materialized view requires additional infrastructure and management.
- API Composition: Make multiple API calls to aggregate data from various services.
- Database Replication (Denormalization): Store necessary data in each service’s database for easier access and avoid cross-service joins.
- CQRS and Event Sourcing: Separate read and write models, using an event store to synchronize and create read-optimized views.
- Data Federation: Use a query layer like GraphQL to fetch data from multiple services and combine it in a single response.
- Materialized Views: Create a read-only data layer that aggregates data from multiple sources, updated periodically or in real-time.
- Order Service
- Payment Service
- Inventory Service
- Notification Service
- Customers report that orders are sometimes placed, but the payment is not processed.
- The Order Service occasionally creates duplicate orders for the same request.
- The Notification Service sends multiple emails for the same order.
- How would you debug and identify the root cause of these issues?
- How would you address the eventual consistency problem in such a system?
- What architectural patterns would you use to prevent duplicate orders and emails?
- How would you ensure that the system remains resilient and does not lose data in the case of service failures?
- How would you improve the observability of this system to detect such issues earlier?
- Analyze logs and traces using tools like ELK Stack, Jaeger, or Zipkin.
- Identify whether the issues stem from network delays, idempotency violations, or message queue retries.
- Check database transactions for duplicate inserts or incomplete states.
- Use the Saga pattern to orchestrate distributed transactions (choreography or orchestration).
- Implement retry mechanisms with exponential backoff for failed processes.
- Utilize message queues (e.g., Kafka) to ensure reliable event delivery between services.
- Enforce idempotency keys for APIs to ensure that duplicate requests don’t result in duplicate processing.
- Use distributed locks or deduplication logic in the Order Service.
- Add a unique event ID for messages in the Notification Service to avoid processing the same event multiple times.
- Implement circuit breakers (e.g., Resilience4j) to handle cascading failures.
- Use persistent message queues to guarantee that events aren’t lost during service downtime.
- Introduce a dead letter queue (DLQ) for failed messages requiring manual or automated retries.
- Set up distributed tracing to follow the journey of a request across services.
- Add custom metrics for critical business flows (e.g., order creation, payment processing).
- Implement real-time alerts for anomalies, such as spikes in duplicate orders or email notifications.
Kafka DLQ Setup: kafka-topics.sh --create --topic orders.DLQ --partitions 3 --replication-factor 1 --config "retention.ms=604800000" Final Recommendations
Best Approach: Use Saga Pattern with Outbox and Idempotency!3. API Gateway and Security
Ques - Your application exposes multiple microservices to the outside world. How would you ensure security, rate limiting, and request valid`ation at the entry point?
1. Security - JWT Authentication
To ensure security at the entry point, we'll use JWT for authentication. All incoming requests will need a valid JWT token to be processed.
Dependencies (
pom.xml):<dependency> <groupId>org.springframework.boot</groupId> <artifactId>spring-boot-starter-security</artifactId> </dependency> <dependency> <groupId>org.springframework.boot</groupId> <artifactId>spring-boot-starter-web</artifactId> </dependency> <dependency> <groupId>org.springframework.security</groupId> <artifactId>spring-security-jwt</artifactId> </dependency> <dependency> <groupId>org.springframework.cloud</groupId> <artifactId>spring-cloud-starter-gateway</artifactId> </dependency> JWT Authentication Filter: @Component public class JwtAuthenticationFilter extends OncePerRequestFilter { private static final String AUTH_HEADER = "Authorization"; @Autowired private JwtTokenUtil jwtTokenUtil; @Override protected void doFilterInternal(HttpServletRequest request, HttpServletResponse response, FilterChain filterChain) throws ServletException, IOException { String token = request.getHeader(AUTH_HEADER); if (token != null && token.startsWith("Bearer ")) { token = token.substring(7); try { String username = jwtTokenUtil.getUsernameFromToken(token); if (username != null && SecurityContextHolder.getContext().getAuthentication() == null) { UsernamePasswordAuthenticationToken authentication = new UsernamePasswordAuthenticationToken( username, null, new ArrayList<>()); SecurityContextHolder.getContext().setAuthentication(authentication); } } catch (ExpiredJwtException e) { response.sendError(HttpServletResponse.SC_UNAUTHORIZED, "JWT Token expired"); return; } } filterChain.doFilter(request, response); } } JWT Token Utility: @Component public class JwtTokenUtil { private String secretKey = "your_secret_key"; // Replace with a secure key public String getUsernameFromToken(String token) { return Jwts.parser().setSigningKey(secretKey).parseClaimsJws(token).getBody().getSubject(); } public boolean validateToken(String token) { try { Jwts.parser().setSigningKey(secretKey).parseClaimsJws(token); return true; } catch (JwtException | IllegalArgumentException e) { return false; } } }2. Rate Limiting
For rate limiting, you can use Bucket4j in Spring Cloud Gateway to throttle requests based on IP or user.
Rate Limiting Configuration (
application.yml): spring: cloud: gateway: routes: - id: user-service uri: lb://USER-SERVICE predicates: - Path=/users/** filters: - name: RequestRateLimiter args: redis-rate-limiter.replenishRate: 10 redis-rate-limiter.burstCapacity: 20 redis-rate-limiter.requestedTokens: 1This setup uses Redis Rate Limiter with a replenish rate of 10 requests per second and burst capacity of 20 requests. This is applied to requests made to the
/users/**endpoint.How It Works Behind the Scenes
Make sure you have Redis set up and Spring Data Redis dependency included.
Add Redis Dependency in
pom.xml: <dependency> <groupId>org.springframework.boot</groupId> <artifactId>spring-boot-starter-data-redis</artifactId> </dependency> <dependency> <groupId>org.springframework.cloud</groupId> <artifactId>spring-cloud-starter-gateway</artifactId> </dependency>3. Request Validation
You can validate incoming requests using Spring Validation annotations (e.g.,
@Valid,@NotNull, etc.) and interceptors in Spring Boot.Example Request Validation:
public class UserRequest {
@NotNull
@Size(min = 2, max = 30)
private String name;
@NotNull
@Email
private String email;
// Getters and setters
}
@RestController
public class UserController {
@PostMapping("/users")
public ResponseEntity<String> createUser(@Valid @RequestBody UserRequest userRequest, BindingResult result) {
if (result.hasErrors()) {
return ResponseEntity.badRequest().body("Invalid request parameters.");
}
// Proceed with processing
return ResponseEntity.ok("User created successfully!");
}
}
Enable Validation in Spring Boot:
@SpringBootApplication public class Application { public static void main(String[] args) { SpringApplication.run(Application.class, args); } } Spring Boot Configuration for Validation:
@Configuration public class ValidationConfig { @Bean public LocalValidatorFactoryBean validator() { return new LocalValidatorFactoryBean(); } } You can configure Spring Cloud Gateway with a combination of filters for authentication, rate-limiting, and request validation4. Complete Gateway Setup
You can configure Spring Cloud Gateway with a combination of filters for authentication, rate-limiting, and request validation.
application.ymlfor Gateway:spring: cloud: gateway: routes: - id: user-service uri: lb://USER-SERVICE predicates: - Path=/users/** filters: - name: RequestRateLimiter args: redis-rate-limiter.replenishRate: 10 redis-rate-limiter.burstCapacity: 20 redis-rate-limiter.requestedTokens: 1 - name: JwtAuthenticationFilter - name: RequestValidationFilter You can implement
JwtAuthenticationFilterandRequestValidationFilteras custom filters in Spring Cloud Gateway.Custom Authentication Filter:
@Component
public class JwtAuthenticationFilter implements GlobalFilter {
@Override
public Mono<Void> filter(ServerWebExchange exchange, GatewayFilterChain chain) {
String token = exchange.getRequest().getHeaders().getFirst(HttpHeaders.AUTHORIZATION);
if (token != null && token.startsWith("Bearer ")) {
// Validate token logic
}
return chain.filter(exchange);
}
}
You can implementJwtAuthenticationFilterandRequestValidationFilteras custom filters in Spring Cloud Gateway.
Custom Authentication Filter: @Component public class JwtAuthenticationFilter implements GlobalFilter { @Override public Mono<Void> filter(ServerWebExchange exchange, GatewayFilterChain chain) { String token = exchange.getRequest().getHeaders().getFirst(HttpHeaders.AUTHORIZATION); if (token != null && token.startsWith("Bearer ")) { // Validate token logic } return chain.filter(exchange); } } Custom Request Validation Filter: @Component public class RequestValidationFilter implements GlobalFilter { @Override public Mono<Void> filter(ServerWebExchange exchange, GatewayFilterChain chain) { // Validate request body logic return chain.filter(exchange); } }Conclusion
In this approach:
You can extend this with more features (e.g., logging, auditing) as needed. This approach secures the entry point and ensures smooth operation across your microservices architecture.
Q7: How would you secure inter-service communication in a microservices architecture?
When security is applied at the API Gateway level (for external requests), securing inter-service communication within a microservices architecture requires a different approach. Since the API Gateway typically handles external traffic, inter-service communication security ensures that services within the system can communicate securely, even when the traffic is internal.
Here's how you can secure inter-service communication in a microservices architecture:
1. Mutual TLS (mTLS) for Service-to-Service Authentication
is a mechanism in which both the client and the server authenticate each other using certificates. It ensures that only authorized services can communicate with each other, providing encryption and identity verification.
How mTLS Works in a Web App?
1️⃣ Client (Service A) sends a request to Service B. 2️⃣ Service B presents its TLS certificate to prove its identity. 3️⃣ Service A also presents its certificate to prove its identity. 4️⃣ If both certificates are valid, they establish a secure connection and start communication. 5️⃣ If one fails, the connection is denied to prevent fraud.
Steps:
Example: Enabling mTLS in Spring Boot
Step 1: Generate Certificates
Both services need their own certificates using OpenSSL:
openssl req -new -x509 -days 365 -keyout serviceA.key -out serviceA.crt
openssl req -new -x509 -days 365 -keyout serviceB.key -out serviceB.crt
Step 2: Configure mTLS in Spring Boot (
application.yml)server: port: 8443 ssl: enabled: true key-store: classpath:serviceA.p12 key-store-password: password trust-store: classpath:serviceB.p12 trust-store-password: password client-auth: NEED # Requires both services to authenticate2. OAuth 2.0 / JWT for Service Authentication
Another approach is to use
How it works:
Example using JWT Authentication:
Service A makes a request to Service B with a JWT token:// Service A: Obtain a JWT token (from IdP) String token = authService.getJwtTokenForServiceB(); // Send the token as Authorization header HttpHeaders headers = new HttpHeaders(); headers.set("Authorization", "Bearer " + token); HttpEntity<String> entity = new HttpEntity<>(headers); ResponseEntity<String> response = restTemplate.exchange( "https://service-b.local/api/endpoint", HttpMethod.GET, entity, String.class);
Service B validates the JWT token:JWT Token Validation (
JwtTokenUtil):@RestController public class ServiceBController { @GetMapping("/api/endpoint") public ResponseEntity<String> endpoint(@RequestHeader("Authorization") String token) { if (jwtTokenUtil.validateToken(token)) { // Process the request return ResponseEntity.ok("Request authorized"); } else { return ResponseEntity.status(HttpStatus.UNAUTHORIZED).body("Invalid token"); } } } @Component public class JwtTokenUtil { private String secretKey = "your_secret_key"; // Securely store this key public boolean validateToken(String token) { try { Jwts.parser().setSigningKey(secretKey).parseClaimsJws(token); return true; } catch (Exception e) { return false; } } }
3. Service Mesh (Istio, Linkerd)
A Service Mesh provides a dedicated infrastructure layer to handle service-to-service communication, security, observability, and more. Istio is a popular choice for securing inter-service communication with mTLS, traffic management, and monitoring.
What is a Service Mesh (Istio, Linkerd) in Simple Terms?
🔹 Imagine a Delivery Network (Swiggy/Zomato)
Similarly, in a microservices architecture:
Key Features:
4. API Gateway for Internal Communication Security
If you don't want to use a service mesh or mTLS directly, you can also secure internal communication through the API Gateway (e.g., Spring Cloud Gateway).
Example: Inter-Service Communication Through Gateway (JWT Auth):
String token = authService.getJwtTokenForServiceB(); headers.set("Authorization", "Bearer " + token); HttpEntity<String> entity = new HttpEntity<>(headers); ResponseEntity<String> response = restTemplate.exchange( "http://gateway/service-b/api/endpoint", HttpMethod.GET, entity, String.class); Gateway validates JWT and forwards the request to Service B.5. API Key or Shared Secrets for Inter-Service Communication
For smaller applications or less complex needs, you can use API Keys or shared secrets for inter-service communication.
Example Using API Keys:
HttpHeaders headers = new HttpHeaders(); headers.set("x-api-key", "ServiceA-SecretKey"); HttpEntity<String> entity = new HttpEntity<>(headers); ResponseEntity<String> response = restTemplate.exchange( "http://service-b.local/api/endpoint", HttpMethod.GET, entity, String.class); Service B verifies the API key: @RestController public class ServiceBController { @GetMapping("/api/endpoint") public ResponseEntity<String> endpoint(@RequestHeader("x-api-key") String apiKey) { if ("ServiceA-SecretKey".equals(apiKey)) { // Proceed with processing return ResponseEntity.ok("Request authorized"); } else { return ResponseEntity.status(HttpStatus.FORBIDDEN).body("Invalid API Key"); } } }Conclusion:
To secure inter-service communication, you can leverage various strategies:
The appropriate method depends on your application's scale, complexity, and security requirements.
5. Database Management in Microservices
In a microservices architecture where each service has its own database, performing a1. API Composition
API composition is a pattern in which a request to a microservice is handled by calling multiple services and aggregating the results in the API Gateway or a separate service. This is a simple and commonly used solution when you need to combine data from multiple services.
Imagine you order food from Swiggy/Zomato:
Instead of calling each service separately, Swiggy’s API Gateway fetches and combines all data into one response.
How API Composition Works in Microservices?
🔹 A single request comes to the API Gateway. 🔹 The API Gateway calls multiple services (like User Service, Order Service, Payment Service). 🔹 It merges the results and sends one response to the user.
Example:
If a user wants to see their orders along with user details, you can make two API calls:
5. Database Management in MicroservicesQues: You have a user service and an order service, each with its own database. How do you handle queries that require joining data from both databases?
In a microservices architecture where each service has its own database, performing a join across different databases (for example, joining data from a user service and an order service) can be complex.
Microservices are typically designed to avoid tight coupling, which means that a traditional SQL
JOINacross different databases is not a good fit.1. API Composition
API composition is a pattern in which a request to a microservice is handled by calling multiple services and aggregating the results in the API Gateway or a separate service. This is a simple and commonly used solution when you need to combine data from multiple services.
Imagine you order food from Swiggy/Zomato:
Instead of calling each service separately, Swiggy’s API Gateway fetches and combines all data into one response.
How API Composition Works in Microservices?
🔹 A single request comes to the API Gateway. 🔹 The API Gateway calls multiple services (like User Service, Order Service, Payment Service). 🔹 It merges the results and sends one response to the user.
Example:
If a user wants to see their orders along with user details, you can make two API calls:
Instead, you can handle this scenario by using some event-driven or data duplication strategies to provide a way to combine data from multiple services. Below are several approaches to handle such queries in a microservices environment: Code Example : @RestController @RequestMapping("/user-orders") public class UserOrderController { @Autowired private RestTemplate restTemplate; @GetMapping("/{userId}") public ResponseEntity<Map<String, Object>> getUserOrders(@PathVariable("userId") String userId) { // Call User Service to get user details ResponseEntity<User> userResponse = restTemplate.exchange( "http://user-service/users/" + userId, HttpMethod.GET, null, User.class); // Call Order Service to get orders for the user ResponseEntity<List<Order>> orderResponse = restTemplate.exchange( "http://order-service/orders?userId=" + userId, HttpMethod.GET, null, new ParameterizedTypeReference<List<Order>>() {}); // Combine the user details and orders Map<String, Object> response = new HashMap<>(); response.put("user", userResponse.getBody()); response.put("orders", orderResponse.getBody()); return ResponseEntity.ok(response); } }
Considerations:
2. Database Replication (Denormalization)
You can replicate some data from one service’s database into the other service’s database. This approach is also known as denormalization. For example, the Order Service can store user details or a user ID as part of the order, which reduces the need for cross-service queries.
In this case:
Steps:
Example:
If you need to join data from the User and Order services, the Order service can keep a copy of the user’s name or email along with the order, so you don’t need to query the User Service each time.
Code Example:
public class OrderService {
    public Order createOrder(OrderRequest request) {
        // Order service keeps a reference of user data like userId
        Order order = new Order(request.getOrderDetails(), request.getUserId());
        orderRepository.save(order);

        // Send an event to update or notify the user service for consistency
        eventPublisher.publish(new OrderCreatedEvent(order));

        return order;
    }
}
Considerations:
3. CQRS (Command Query Responsibility Segregation) and Event Sourcing
Using CQRS and Event Sourcing allows you to have a read-optimized view that may combine data from multiple services.
Steps:
Example:
Considerations:
4. Data Federation
A data federation solution can create a unified query layer that can fetch data from multiple microservices and provide it in a single response. A data federation solution can create a unified query layer that can fetch data from multiple microservices and provide it in a single response.
In this approach:
For example, using GraphQL can help achieve this federation pattern, as GraphQL allows you to define a unified schema that queries multiple backends (services).
Example (using GraphQL Federation):
type User {
id: ID!
name: String!
}
type Order {
id: ID!
product: String!
userId: ID!
}
extend type Query {
userOrders(userId: ID!): [Order]
}
Considerations:
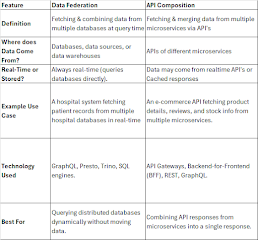
Difference Between Data Federation and API Composition5. Materialized Views (Data Warehousing)
Another approach is to create a materialized view that combines data from both the User Service and the Order Service into a dedicated reporting database or read-only view
Steps:Considerations:
Conclusion:
To handle queries that require joining data from multiple services' databases in a microservices architecture, you can:
The right approach depends on your specific use case, including the frequency of the queries, data consistency requirements, and the complexity of your architecture.
You’re leading a team managing an e-commerce platform built using microservices. The architecture consists of the following services:
One day, you notice the following issues:
Questions for Discussion:
Expected Approach/Answer
1. Debugging the Root Cause:
2. Addressing Eventual Consistency:
3. Preventing Duplicate Orders and Emails:
4. Ensuring Resilience and Data Integrity:
5. Improving Observability:
Q3: How would you handle eventual consistency in a distributed system where multiple services update different parts of a business transaction?2. Service Discovery and Load Balancing
Q4: Your microservices need to dynamically discover each other without hardcoding URLs. How would you implement service discovery?
Q5: If a service instance is experiencing high load, how do you ensure traffic is evenly distributed across multiple instances?
3. API Gateway and Security
Q6: Your application exposes multiple microservices to the outside world. How would you ensure security, rate limiting, and request validation at the entry point? Q7: How would you secure inter-service communication in a microservices architecture?
4. Fault Tolerance and Resilience
Q8: One of your microservices is calling an external third-party API, which becomes slow. How would you prevent cascading failures in your system?
Q9: How would you implement a circuit breaker pattern in a Spring Boot microservice?
Q11: How do you ensure data consistency across multiple microservices using different databases?6. Event-Driven Architecture
Q12: Your application needs to notify multiple services when an event occurs (e.g., a new order is placed). How would you design this system? Q13: What are the advantages and challenges of using Kafka for event-driven microservices?
7. CI/CD and Deployment Strategies
Q14: How would you deploy microservices with zero downtime? Q15: Your microservices are running in Kubernetes. How do you roll back to a previous version if a new deployment has issues?
8. Observability, Monitoring, and Logging
Q16: How do you trace a request that goes through multiple microservices?
Q17: How would you centralize logs for all microservices and analyze errors efficiently?
Refer below Link for Diagrams for each scenario
Top scenario based microservices interview questions — Eraser

No comments:
Post a Comment